The production of mechanical keyboards is an increasingly popular trend worldwide. While the renowned 4th Day currently rules the mechanical keyboard market, community-run initiatives are challenging it. Tiny online stores like ours and discussion boards that aim to alter the way we see keyboards.
The scene for custom mechanical keyboards is enormous. Since this knowledge is so dispersed, it’s almost hard to discover everything you need to create a keyboard without spending hours on forums.
This tutorial will walk you through every stage of creating your first mechanical keyboard, including the components, construction, and other specifics. We hope you’ll see that creating your own is easier than it may seem!
Earlier than the instructions. It is important to remember a few things while building a keyboard.
Group Buys
Community-driven projects are managed by suppliers, designers, and even hobbyists. Typically, projects go through a phase of interest evaluation. To ensure the project’s viability, establish a minimum order quantity. Just watch for the item to arrive at your door. This procedure might take a while (6-12 months).
In-Stock Parts
There are keyboard kits or components in stock. People may shop without feeling pressed and wait for larger purchases. Usually, stock of these parts runs out quite rapidly. Although this is sometimes the shortest and least expensive choice, the group buy program might need to be more inventive.
Step 1: Decide What You Want On A Keyboard
Most challenging phase in creating a keyboard, perhaps!
- You must choose the keyboard size you desire.
- Which format—ISO or ANSI—do you require? Consider the keyboard’s language. This will determine the size of your keyboard’s keycaps and keycaps.
- Do you require any particular case material? Should I use wood, bamboo, aluminum, or acrylic for the best RGB performance?
The wonderful thing about hobbies is that you can finally design the perfect keyboard for your preferences and requirements. Your desire to be as distinctive as possible has absolutely no bounds.
Consider the qualities you desire.
- RGB Light: Acrylic case translucent keys with RGB side, bottom, and per-key lighting to highlight pudding underflow.
- USB port: Most contemporary boards include USB C ports. However, additional USB kinds exist.
- QMK or VIA is the keyboard’s programming software. Some are QMK or both compatible.
These are the details and what we think about each size. Generally speaking, 60% is likely the least expensive purchasing position. And when the scale grows, the costs grow as well.
- Full Size: This type of custom keyboard is uncommon. Only present in keyboards that have already been assembled. If you’re fortunate, you can create or support a project driven by the community (group purchase).
- 1800-Compact (96%): Makes an effort to store data in a small-footprint manner with minimal access time. Parts are tough to come by, and pre-built keyboards like the Keycron are seldom found outside.
- Tenkeyless (or TKL): A popular keyboard layout that keeps the remainder of the layout but does away with the number pad.
- 75%: The navigation cluster is identical to TKL except that it is vertically oriented to conserve space and is enjoyable, fashionable, and pleasant to operate.
- Missing function rows, although certain navigation clusters are kept. Moreover, it is the smallest keyboard size with arrow keys.
- 60%: Most typical custom keyboard configuration. The 60% design can also be seen in variants with a navigation arrow. For instance, without the window button, you can easily locate the components in stock and frequently for less!
- 40%: No numerals, 60% pattern. It may be difficult to adjust to this size.
- Macropad: A unique set of keys that may be used with your standard keyboard and are often used as a numpad but can also be programmed to perform other tasks!
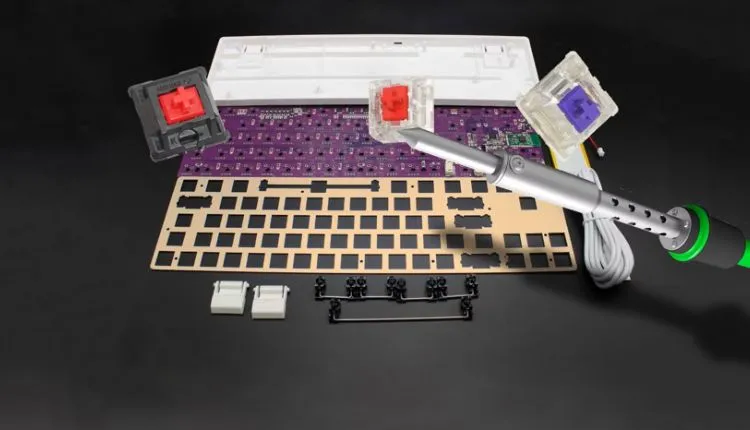
Step 2: Assembling Your Keyboard
We advise beginning with the PCB. To begin, connect the PCB to the computer via the USB cable, and check that each switch input is operational.
Make use of anti-static tweezers like the ones in this package. And then, place the tips of both tweezers on the PCB’s two copper holes.
When done, the PCB presses a button once the key has been activated. We advise downloading the QMK or VIA program to view it in action.
Once you have confirmed that all the inputs are functioning properly, now is the time to begin constructing.
Step 3. Install The Stabilizers.
On a mechanical keyboard, stabilizers are employed to “stabilize” the huge keys. Every pushbutton bigger than 2U, or the size of two pushbuttons, must be assembled separately before being ready for mounting on the PCB (or plate, if available).
The stabilizers appear like this in the finished product.
The rod’s visible portion should first be inserted into the housing’s bigger portion. Please pick up a steel wire as you proceed and place it into the trunk’s bottom chamber. After you do this, the wire will adhere to the pin if you push it down. Repetition will result in the following 2U Biller status:
You must add the Thrust to the PCB once it has been put together. Just cutting or inserting a spike into a PCB hole does this.
Step 4. Installing The Plate And Switches
The PCB may be sandwiched to install the plates, and the switches can be put at various PCB corners. The switches are rather stable and designed to clamp. Don’t worry if the plate begins to bend after you’ve pinned it to the PCB because the pad will function properly if there are more switches.
Step 5. Soldering The Switches (Optional If PCB Is Hot-Swap)
For many individuals, soldering might be scary. Newcomers can avoid all of these processes by using the Hotswap PCB. Of course, if you like a certain design. Your switch will need to be soldered.
The procedure is relatively easy to follow and relies more on muscle memory than specifics. But, by heating the solder point, the solder will melt and form a volcano-like structure.
We advise practicing your soldering or viewing instructional videos. This technique carries risks, such as burning oneself or inhaling harmful gases. Carefully read the soldering handbook and take the necessary safety measures.
Step 6. Assemble The PCB/PLATE Into The Case
Depending on the mounting method, this may change (e.g., case mount, tray mount, etc.). Just put the PCB onto a casing or other mounting mechanism to complete the procedure most of the time.
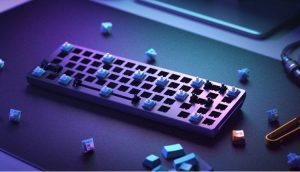
Step 7. Installing Keycaps
The easiest part of building the keyboard is what ties the board together. There are some suggestions, though, that we’ll expand on in our comprehensive keypad guide.
Many alternatives, designs, materials, and production methods are available for keycaps. You could have compatibility problems as a result. It’s possible that the package needs to contain the keycap size that your board requires. When making a purchase, carefully know the size of the keycaps included in the set.