Custom stickers remain one of the simplest ways to package a message, brand, or visual identity into a compact format. They are used for product labels, event materials, classroom tools, packaging inserts, and promotional campaigns. What makes them appealing is not just their flexibility, but their speed: a small surface that can carry a clear, durable signal.
For beginners, the obstacle is rarely creativity. It is setup and execution. File resolution, print dimensions, bleed margins, export settings, and material selection often create more confusion than the design itself. Modern custom sticker maker tools reduce that friction by combining templates, preset canvas sizes, and simplified export workflows.
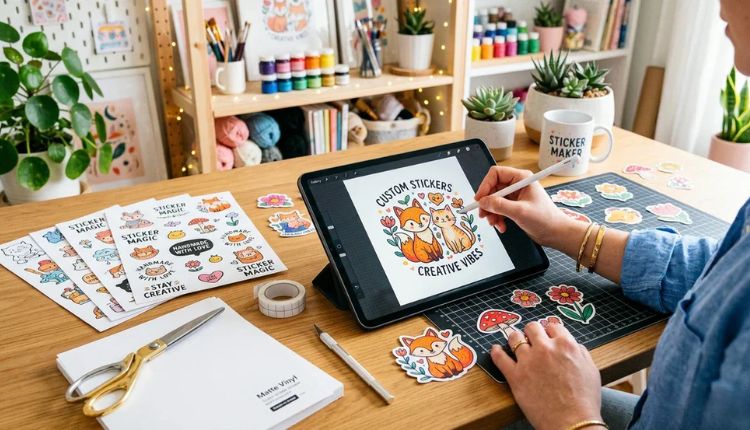
Most tools in this category provide three core features: editable templates, drag-and-drop design controls, and print-ready export options. A browser-based workflow such as online sticker design from Adobe Express is a practical starting point for users who want structured guidance without installing complex software.
The step-by-step guide below focuses on process decisions and quality checkpoints. Adobe Express is referenced as an example workflow, and additional tools are mentioned in context where they support specific steps.
Step-by-Step How-To Guide for Using Custom Sticker Maker
Step 1: Set the Correct Size and Shape Before Designing
Goal
Establish accurate print dimensions and shape before adding any design elements.
How to do it
- Open a preset sticker canvas using a browser-based tool such as Adobe Express.
- Choose a standard shape (circle, square, rounded rectangle) for easier cutting and printing.
- Confirm the exact physical dimensions (for example, 2×2 inches or 3-inch circle).
- Check whether your print provider requires bleed (usually 0.125 inches).
- Decide if you are printing single stickers or sticker sheets.
What to watch for
- Designing at screen resolution (72 DPI) instead of print resolution (300 DPI).
- Scaling up a small canvas later, which lowers print clarity.
- Ignoring bleed for edge-to-edge color designs.
- Selecting a size that doesn’t match printer settings.
Tool notes
If you want to confirm print specifications before designing, checking guidelines from a print service such as Vistaprint can help you verify required file formats and bleed margins before export.
Step 2: Choose a Structured Template or Minimal Layout
Goal
Create a balanced design without advanced layout knowledge.
How to do it
- Start from a sticker template instead of a blank canvas.
- Replace placeholder text with your own message.
- Keep one main headline and one supporting graphic.
- Align elements centrally unless the design requires intentional offset.
- Leave consistent margins around all edges.
What to watch for
- Overcrowding a small surface with too many elements.
- Using more than two fonts.
- Placing text too close to the trim line.
- Mixing conflicting visual styles.
Tool notes
If you are preparing icons or vector graphics separately, a tool like Inkscape (open-source vector editor) can help you create clean SVG graphics before importing them into your sticker layout.
Step 3: Make Text Legible at Actual Sticker Size
Goal
Ensure the message remains readable once printed.
How to do it
- Use bold, simple fonts for primary text.
- Increase font size more than expected—stickers are small.
- Keep wording concise (ideally under 10 words for compact formats).
- Use high contrast between text and background.
- Zoom out to approximate real-world viewing size.
What to watch for
- Thin script fonts that blur when printed.
- Long taglines that wrap awkwardly.
- Light gray text on white backgrounds.
- Decorative fonts that sacrifice clarity.
Tool notes
For testing contrast and accessibility, a contrast-checking tool like WebAIM’s Contrast Checker can help confirm readability before export.
Step 4: Add Graphics and Backgrounds Carefully
Goal
Enhance visual impact without reducing clarity.
How to do it
- Add one primary graphic element (logo or icon).
- Use solid background colors rather than busy patterns.
- Frame text with simple shapes if needed.
- Keep graphics within safe margins.
- Check image resolution before placing.
What to watch for
- Low-resolution PNG files that pixelate when printed.
- Background textures that distract from the message.
- Overuse of shadows or effects.
- Clipping important details at the edge.
Tool notes
If you need to remove image backgrounds before import, a background-removal tool such as remove.bg can help prepare cleaner graphics.
Step 5: Export a Print-Ready File
Goal
Produce a file that meets professional print standards.
How to do it
- Confirm resolution is set to 300 DPI.
- Ensure final dimensions match your intended print size.
- Enable bleed if required.
- Export as a high-quality PDF or PNG depending on printer guidelines.
- Review the exported file at 100% zoom before submitting.
What to watch for
- Exporting compressed or low-quality images.
- Forgetting bleed when background color reaches the edge.
- Sending RGB files when CMYK is required (confirm with printer).
- Flattening files incorrectly if transparency is used.
Tool notes
If your printer requires specific PDF standards, software like Scribus can help refine and prepare press-ready PDF files.
Step 6: Order Prints and Manage Production
Goal
Move from design to distribution efficiently.
How to do it
- Upload the file to your chosen print provider.
- Carefully review digital proofs.
- Select appropriate material (matte, glossy, vinyl, waterproof).
- Order a small test batch before scaling up.
- Track version numbers and print runs.
What to watch for
- Approving proofs without reviewing spelling.
- Choosing materials unsuitable for outdoor or long-term use.
- Mixing up versions during reprints.
- Skipping sample orders with new printers.
Tool notes
For coordinating production timelines, a project management tool such as Asana can help track revisions, proof approvals, and distribution steps without interfering with design tasks.
Common Workflow Variations
Photo-Based Stickers
Crop tightly, remove unnecessary background, and increase contrast. Ensure original image resolution supports 300 DPI at final size.
Logo-Only Branding Stickers
Center the logo, increase white space, and use strong color contrast to maintain clarity at small scale.
Event or Giveaway Stickers
Use bold typography and minimal wording. Prioritize immediate readability over decorative styling.
Small-Batch Selling
Maintain consistent file naming and dimensions across product variations to simplify reordering and fulfillment.
Checklists
Before You Start Checklist
- ☐ Final sticker dimensions confirmed
- ☐ Printer or print service selected
- ☐ High-resolution graphics prepared
- ☐ Brand colors defined
- ☐ Text limited to essential wording
- ☐ Bleed requirements confirmed
- ☐ Timeline for print and delivery established
- ☐ File naming system created
Pre-Export / Pre-Order Checklist
- ☐ Resolution set to 300 DPI
- ☐ Canvas size matches final dimensions
- ☐ Bleed and safe margins verified
- ☐ Spelling and punctuation reviewed
- ☐ Text contrast tested
- ☐ File exported in correct format
- ☐ Proof reviewed at 100% zoom
- ☐ Version number labeled clearly
Common Issues and Fixes
Blurry print output
Replace low-resolution images and confirm export at 300 DPI.
Text cut off during trimming
Increase safe margins and verify bleed setup.
Colors look dull compared to screen
Confirm printer color profile (RGB vs CMYK) and adjust saturation slightly if needed.
File rejected by printer
Review required file format and flatten settings before resubmission.
How To Use Custom Sticker Maker: FAQs
Is a template necessary for beginners?
Templates reduce spacing errors and accelerate setup, but a correctly configured blank canvas can work just as well.
What is the safest export format for print?
PDF is commonly preferred because it preserves layout and resolution.
Should I design in RGB or CMYK?
Confirm with your printer. Many online services accept RGB, but professional print shops may request CMYK files.
How large should text be on small stickers?
Primary text should remain clearly legible at arm’s length. Testing by zooming out on screen can approximate this.
What makes a sticker design effective?
Clarity, contrast, and restraint. One message, one focal point, and correct technical setup typically outperform complex layouts.